Baby Linen
or How to Make a Basic Essential Layette
for Eighteenth Century Re-enactor Infants
Napkin or clout
The choice is yours what to use for diapers. Many parents opt for disposables, which are very convenient, especially when camping. However, disposable diapers give off that tell-tale rustle of plastic and paper, and some parents disapprove of them on other grounds. Also, you may desire Junior’s wardrobe to be historically accurate from the skin out. The problem here is that there appear to be no known surviving extant 18th c. diaper artifacts we can copy. Therefore, with regard to baby-napkins, your options are all inherently somewhat less than historically accurate--you can either use modern cloth diapers, replicate a documented pattern from written directions which are well past the period you are re-enacting, or invent something entirely "out of whole cloth", so to speak.
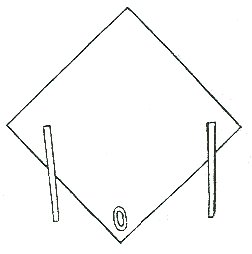 |
One basic pattern comes from The Workwoman’s Guide, by A Lady 1838, reprinted by Dover, (p. 29 & pl. 3 fig. 11). Freely paraphrased, it says to cut each "napkin" 22½" x 45", sew all around with a ¼" seam allowance, leaving about 4" open. Then turn it right side out and slipstitch the opening shut. You now have a 22" double-thickness square, with all raw edges enclosed. This was intended to be folded triangle-wise for use. The author recommends sewing a tape-tie just in from the edge at each of two diagonally opposite corners, and a small tape loop at one other corner, so you can tie the "napkin" on the baby instead of using pins. (Colleen Humphreys says this worked "just fine" for her children.) |

click images for larger view 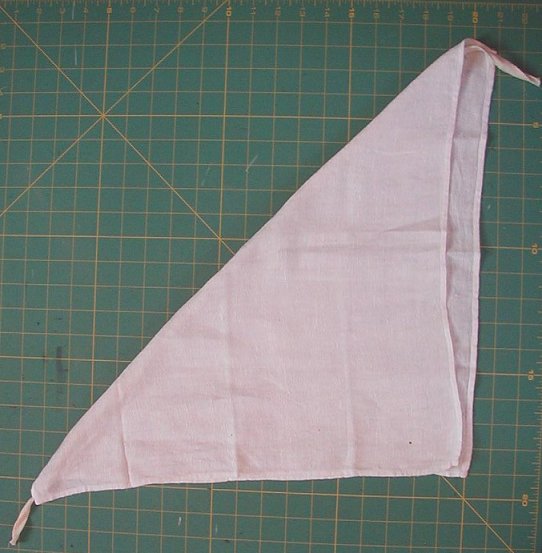 |
In actual practice, a 22" square diaper is good for an older baby but rather large for a newborn, a 16" to 18" square is a better size. In fact, the "napkin" shown in the photograph is an old 18" square linen damask luncheon-napkin. Now too worn out for table use, it has become very soft and absorbent. One of these (or two of them sewn together for extra absorbency) would be perfect for a newborn-size baby-napkin. If you’re buying modern diaper cloth, you should preshrink it and then cut out each "napkin" as a rectangle twice as long as it is wide. For example, if the washed fabric is 34" wide, cut the rectangles 17"x 34" for a newborn-size diaper. Fold in half to make a doubled square 17" x 17", sew all around, turn and sew shut as described above. Exact dimensions are not as important as proportions-you want your finished "napkin" to be a square. With no specific documentation to support this, I would then take a piece of cotton twill tape ½" wide, cut it 36" long. Find the middle of the length of twill tape and sew it to the exact center of your doubled square. Fold the square diagonally into a triangle so that the ends of the twill tape extend along the diagonal fold and stick out at each end. You can sew a tape loop to one of the opposite corners if you think you’ll need it. By wrapping the 36" long tape around and tying as needed, you should find the 17" diaper adjustable in size for the first few months, until Baby outgrows it and is ready for the 22" diaper. |
 click image for larger view |
To put the napkin on the baby, lay the napkin down on a clean surface with the folded edge, the hypotenuse of your triangle, at the top and the ties extending to either side. The other corners will be pointing downward, and the corner with the tape loop sewn to it should be the bottommost layer, so that when you bring it up between Baby’s legs, this loop ends up on the outside. Put Baby on the napkin so that the top edge is at or a little above Baby’s waist. Bring the bottom of the triangle, and that tape-loop, up between Baby’s legs. Fold one side of the hypotenuse around Baby’s waist and thread the tape-tie through the loop. Do the same with the other side. Tie the two long ends of tape to secure the napkin. |
This is the idea in theory, but how well it works for you will depend on the anatomy and excretory habits of your particular baby. In the photograph, I have wrapped the tape-tie, and the folded hypotenuse of the napkin, completely around the baby’s waist before threading the tape-tie through the tape-loop, as this baby is newborn-size, and I found that this arrangement gave good coverage at the groin without too much bunched-up fabric. You’ll probably have to experiment to see what configuration of folding and tying is optimal for your baby’s needs, and you’ll probably modify your diapering technique as your baby grows. Be sure that all tapes, both their loops and their loose ends, are well tucked in so that Baby cannot get himself snagged or entangled.
A word of advice: If you put tape-ties on baby-napkins, or anything else, you might want to tie the ties together before you put the diaper into the wash. Otherwise, you may find yourself with a tangled mess after the laundry is washed!
pattern diagrams may be copied for personal use,
all other rights reserved
http://villagegreenclothier.com/showroom/infantclothes.html
-
Introduction
- Cap
- Diaper, known in the period as "napkin" or "clout"
- Pilch or Pilcher, a diaper-cover
- Shirt
- Petticoat
- Roller, swaddling-band, belly-band, or "surcingle"
- Bed gown or robe
- Bib, also Drool cloth, burp cloth, the "muckinder"
- Stockings, Shoes, Booties
- Baby sling, baby carrier
- Blanket, basket, bedding
- Final Reminder
Sources
Baby Swaddling Photo Series
Baby Gown Photo Series

Home