Baby Linen
or How to Make a Basic Essential Layette
for Eighteenth Century Re-enactor Infants
Cap
All 18th c. infants wore at least one cap, or as many as three. There was a wide variety of methods of cutting 18th c. baby caps and many techniques were used to embellish them--drawn thread work, hollie-point needle-lace insertions, white-work embroidery, bobbin lace insertions and edgings, to name a few.(see Baumgarten, figs. 226 & 227)
One such cap, at the Museum of Fine Arts, Boston, can be seen online. Example baby cap
click image for larger view |
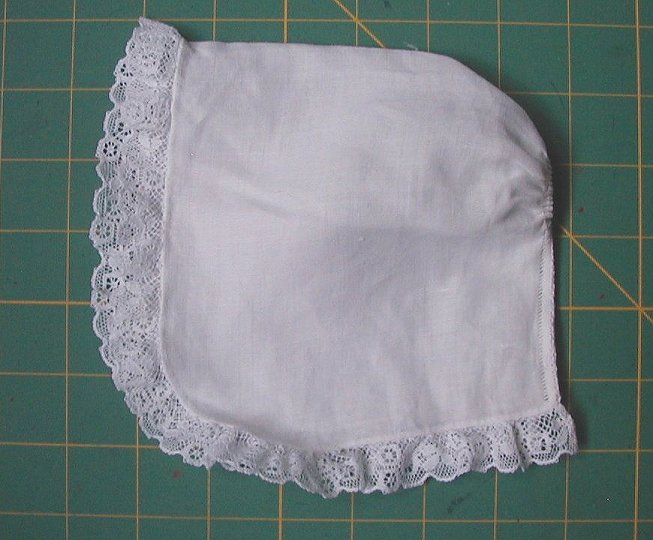
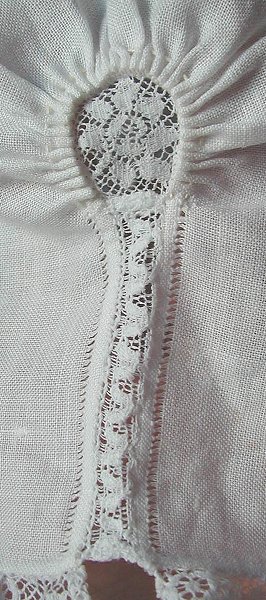
Here is a generic cap distilled down to the barest essentials, based upon two caps in the Winterthur collection (Swan, fig. 8) and one in the Historic New England collection (to be discussed in detail in my forthcoming book). While most surviving examples of this general style have "hollie-point" needle-lace worked to fit the center of the cap crown, the example from the Historic New England collection documents the use of a scrap of recycled lace as described in option #3. |
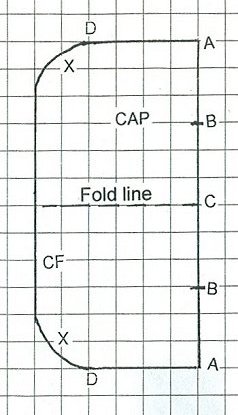 |
To make the cap: (Each square of the grid = 1") 1. Cut from fine linen, one piece 6" x 12", rounding off two corners at X as shown. Sew a fine hem all around, as narrow and fine as you can manage. Finished size should be at least 5 ½" x 11". 2. Sew two sides together from A to B, by placing the hemmed edges butted up together side by side and sewing a small whipstitch, so the edges will remain lying flat. 3. Using heavier thread, sew a running stitch from B to C to B, and draw up into a circle of radiating pleats. Fasten off. |
4. If size adjustment is necessary, run a heavier thread from D to A on each side, securing one thread at each D and leaving it extend at A. These threads can then be drawn up and tied in a bow at A.
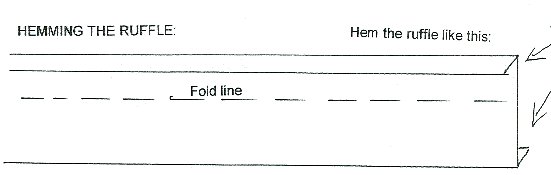
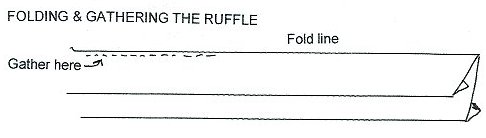
5. Cut a ruffle strip 1 ¾" x 32". Sew hems, as narrow and fine as possible, around all edges. Finished strip should be roughly 1 ¼" x 31". Fold hemmed strip the long way, with the fold offset so that one side is ¾" and the other is ½". Gather along the fold, and with ½" side uppermost, whipstitch ruffle to edges of cap. Ruffle should have extra fullness at X, and relatively less fullness elsewhere.
Note: To be really precise about this, you should hem the strip so that each hem turns to a different side of the cloth. That way, when you fold the strip before gathering, both hems will end up oriented to the same side of the finished ruffle. But if you overlooked this nicety, as long as your hems are fine enough and neat enough, it’s probable that nobody will notice!
Options for ornamentation:
  optional lace insertions- outside.....inside click images for larger view |
1. Use drawn-thread hem-stitching instead of plain hemming in step #1. 2. Herringbone-stitch "faggoting", or a strip of narrow lace insertion (¼" to ½" wide), can be used to join A-B to A-B in step #2. If using lace insertion, cut a piece 3" long, whipstitch one side of it to A-B and other side to the other A-B. Finish the top and bottom edges of the lace insertion with a narrow hem or overcast stitch. 3. Insert a scrap of fine lace about 1 ¼" square behind the radiating pleats in step #3. Leave the circle of drawn-up pleats with a ¾" opening and slipstitch this to the lace from the right side. Then turn to wrong side, turn under raw edges of the lace and slipstitch as needed. 4. Cotton lace edging, ½" to ¾" wide, can be used for the ruffle. |
Most original caps do not show evidence of ties, but you may want to add them. If so, cut two pieces of ¼" or ½" wide white cotton twill tape, each 7" long, and sew one to the hemmed edge of the cap at each X.

pattern diagrams may be copied for personal use,
all other rights reserved
http://villagegreenclothier.com/showroom/infantclothes.html
-
Introduction
- Cap
- Diaper, known in the period as "napkin" or "clout"
- Pilch or Pilcher, a diaper-cover
- Shirt
- Petticoat
- Roller, swaddling-band, belly-band, or "surcingle"
- Bed gown or robe
- Bib, also Drool cloth, burp cloth, the "muckinder"
- Stockings, Shoes, Booties
- Baby sling, baby carrier
- Blanket, basket, bedding
- Final Reminder
Sources
Baby Swaddling Photo Series
Baby Gown Photo Series

Home